Madd Gear BMX Balance Bike Assembly InstructionsUpdated 2 months ago
Need help assembling your Madd Gear My 1st BMX or Zycom ZBike? You can find the online instruction manual for the Madd Gear bike here and the Zycom bike assembly video below.
Step-by-step assembly instructions for the Madd Gear Balance Bike.
Step 1. Slide the fork steerer tube up inside the main bicycle frame. If the headset bushings are not installed, press those into the frame ensuring the one with the embossed slot is on the bottom and the slot is at the back or towards the rear of the bike. This is the steering lock that prevent little ones turning the handlebar too far.

Step 2. Locate the handlebar. Slide the plastic clamp cover onto the handlebar stem. the open portion of the plastic clamp cover should face down or away from the handlebar grips.

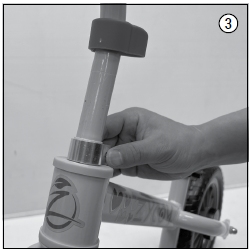
Step 3. Locate your silver handlebar clamp. This is a circular clamp with single bolt. Slide the handlebar clamp on top of the fork steerer tube that you installed in step 1.
Then, slide the handlebar stem down inside the fork steerer tube.
The handlebar can be adjusted to the appropriate height before tightening the clamp based on your child's age or size.
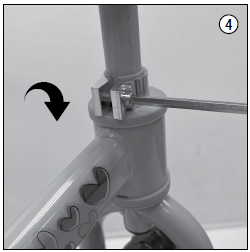
Step 4. Align the handlebar with the fork or front wheel. Tighten the handlebar clamp with the supplied allen wrench. Ensure the clamp is tight and the handlebar does not move out of alignment with the front tire.
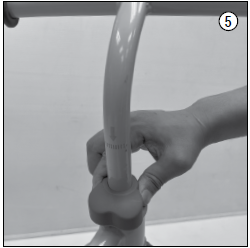
Step 5. Slide the clamp cover down over the top of the handlebar clamp.
Step 6. Depending on the model of Balance Bike you have, the seat post clamp may be a single bolt Allen wrench clamp or a quick-release style clamp.
Locate your seat post clamp and slide it over the seat post tube on the frame. Ensure the opening in your clamp aligns with the slit in the frame. This allows the clamp to pinch the tubing and secure the seat tube.

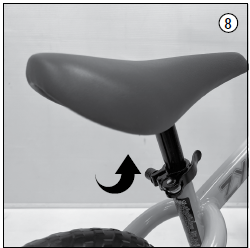
Step 7. Install the balance bike seat. Slide the seat post down into the frame.
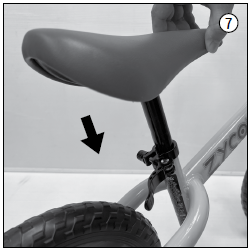
Step 8. Now, align the seat with the frame and adjust to the appropriate height for your child. take note of the minimum insertion depth which is identified by an engraved line on the seat post.
Tighten your seat post clamp with either the Allen wrench or by using the quick-release clamp.
Note: If you find the quick-release clamp is not tightening enough. Open the clamp lever and tighten the small nut on the opposite side. Close the clamp and test for tension. Repeat this process until the clamp is difficult to close and provides sufficient clamping force.
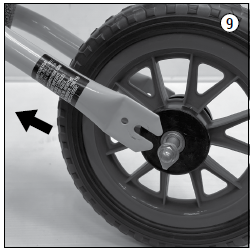
Step 9. Install the rear wheel on the balance bike. Take your rear wheel assembly and loosen the nuts on each end of the axle. Note: Do not remove them completely. Allow them to stay attached to the axel by a couple of threads.
By loosening the nuts, this will allow you to install the rear wheel inside the frame. Make special note of which side the washers sit against the frame.
Step 10. Here's a close-up of the order the rear wheel washers sit. Ensure both sides match.
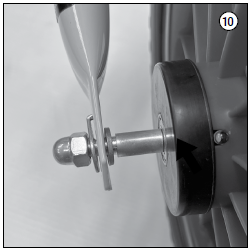
Step 11. You will notice that one of the washers (the outer washer) has a locking hook that aligns with a locating whole in the frame. Ensure the washer hook drops into this hole when tightening.
This is a safety feature and should be assembled correctly for the rider's safety.
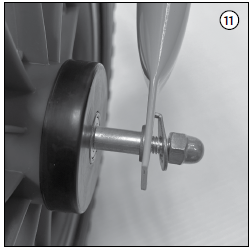
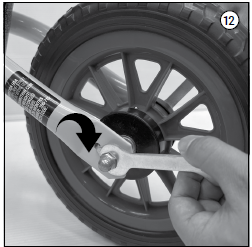
Step 12. Final step, use the supplied open-ended wrenches to securely tighten the rear axle in place. You need to place a wrench on each side of the axle and tighten down the nuts.
That's it, your little rider is now ready to ride their new balance bike! If you have any further questions, please reach out to our customer support team.